The post Family Year Book {Why I use Blurb} appeared first on A Mouse In My Kitchen.
]]>Did you happen to check out my introduction to family year books before reading this? If not, check it out!
Okay, So the VERY FIRST question I always get about my year books is where I get them printed. So I thought I would let you guys know how, why, quality, price, etc.!
First off, I have tried a lot of different websites. I ultimately decided on Blurb because they are the whole she-bang {Anyone else think of Shedaisy when I say that, or anyone else remember she-daisy? Okay, moving on}
1. Blurb is great quality. They are bookstore level books! You can get paperback, hardcover, or dust jacket. They have three types of paper, matte, gloss, or lustre. They also have a variety of sizes to choose from, Trade 6×9, Pocket 5×8, Large Square 12×12, Large Landscape 13×11, Standard Landscape 10×8, Standard Portrait 8×10 {What I get for my books} and small square 7×7 {My sister’s favorite} . My pictures ALWAYS print beautifully and I am always in awe with how well the book turns out. Their binding is incredible and even holds up against my one year old and three year old children!
2. Blurb is easy to use! When I make my blog book I go in and download their software and then am able to slurp my blog by logging into my blog and selecting the posts I want to add to my book. Then, I am able to use blurb’s software program to create and personalize my blog posts, and make the book entirely my own {with their helpful program!} I love the ease of it, and, that I am also able to change it as much as I want or like to before it is printed. After I am finished editing my book, I load it to their website {from their program} and order right from there. It is THAT easy!
3. Blurb is affordable. I have looked into a lot of websites that print very pretty books. But, they are EXPENSIVE. If I am going to get these printed regularly, I need something I can afford, and something where I can get a deal. Blurb sends me coupons all. the. time. to get my book printed. They offer deals and are always improving how they do things. The quality and price cannot be beat, and I have yet to find somewhere else that gives me such an affordable deal for such great quality. I am able to get a hardcover year book with 100+ pages for around $45 dollars.
4. Blurb has SO MANY OPTIONS! When I went to order my last book, they gave me the option to buy it as an e-book or pdf to share with family. How cool would that be? Or how neat to have it saved on your iPad, Kindle, etc.! And maybe, you don’t want to print your book, you just want to be able to look at it on your computer or hand held device. You can get them saved in that format, also! How neat! 
5. Blurb gives me the convenience I need to keep up on family memories and have them last forever. I used to scrapbook, and could not keep up financially buying all the cute papers and stickers, and time wise, I did not have enough TIME to scrapbook everything! Then I moved on to digital scrapbooking, a bit quicker but still not quick enough for me to keep up. I needed something that I could keep up with even with small children when I only have an hour at night {if that} to journal and organize pictures. I needed something that as my life got crazier, I could keep up with. Having Blurb print my blog has given me all that. I can keep up on my blog, slurp it into a book, and spend a few minutes editing, and I am done. I get it printed once a year and after I get it printed, blurb keeps it on their database forever. SAY WHAT? Yeah, once I get them printed, they NEVER delete them. Which means one more place I have my precious photos saved in case I loose them all in a fire, flood, etc.
I cannot say enough good about this company. I love them! Haha, I have been using them for about five years now, and just tell everyone about them! They are WONDERFUL!
And! With the holidays coming up fast, what better way than to share a photo book as a gift? My parents LOVE getting books and photos of our kiddos you can check out their holiday guide here.

I love their personalized planners on page 5! And their recipe books on page 6! The possibilities are endless. The gift guide is also an amazing instruction book on how to make a variety of different Blurb products! Get a head start on your Christmas List and get 20% off your Blurb book by using the code EARLYBIRD20 before 10/7/2013.
Happy Blurbing! {Feel free to ask any and all questions, silly or no! I love talking about these year books!}
Traci
The post Family Year Book {Why I use Blurb} appeared first on A Mouse In My Kitchen.
]]>The post Moving Tips: The week before… appeared first on A Mouse In My Kitchen.
]]> Ohhh moving! I have a love hate relationship with it. Really, I love being able to try out a new home and find all the things I love about it {and we usually get more space each time, too!} We have been married almost five years and just made our fifth move. {I know, really? Who does that, We do!} It’s been really fun. We have lived in three states together and they’ve been West Coast, East Coast, and MidWest. Anyway! I don’t know if I am a pro at it yet, but I do have a few tips for the week before! Here goes:
1. Markell mentioned that you need to start packing 1-3 months before. I HIGHLY recommend this. Have everything packed that you don’t absolutely need up to the last week. That last week you really only want to have to do minimal packing so that you can get the other things done and not be stressed out of your mind. Pack up your kitchen last, and use paper products the last few days before so that you can pack all of your dishes.
2. Which brings me to number two. Go through your fridge! Try to use up all that you can in your fridge so that you don’t have to pack it! Things in your pantry tend to travel better Don’t worry about using those up as much. Our last two moves were across the country, so we could not take ANYTHING that needed to be refrigerated or frozen. Start to give away some of the condiments in your fridge, too. I have been the recipient of half used ketchup’s and mustard’s and have been so grateful, friends with be grateful, too. Better than just tossing it all right? I have to add, when we just moved across town {a half an hour move} We kept those things and put them in a cooler. Plan according to the distance you move of course
3. If you have kiddos, be understanding that they are so confused. Prepare them for what is going to happen, and let them know repeatedly what the plan is. You are turning their whole world upside down. Be patient with them and recognize they may be a bit off attitude wise. I had to keep reminding myself it was the hardest for them, and they were just trusting that their they would see their toys again. Maybe let them write notes to their friends and let them say good bye to a few of them.
4. Leave on box of toys for your kids that last week. I just picked out as many as would fit in one box and packed the rest. That way, the day you pack up the truck, you just throw that one in and your kids aren’t mad at you all week for packing their toys! You will need them entertained.
5. Put together your paperwork you will need to move. Start a little pile/folder of things that you will need and cannot be packed.For instance, plane tickets, rental agreements, keys to move in, phone numbers, car rentals, etc.
6. Double check on plans! Make sure your rental will be ready for you, the apartment complex you are planning on is ready for you, or the home you purchased is ready, too. Also call your Uhaul, Upack, Pod, whatever, make sure they are ready for you! We called about a Uhaul our last move and they didn’t remember! They sent us to a different location to pick up our truck and everything. Even if you are organized, many companies are not.
7. Which brings me to my two cents on moving companies. Please bear with me. I hope you have already chosen. I just want to share my experience. We have used a horse trailer, Uhaul and a company called Upack {ABF Trucks, seen those?} We moved a half an hour away and used a horse trailer {borrowed}, then we moved from Idaho to Florida and used a company called Upack. They are incredible. Less expensive than a Uhaul if you are moving a long distance {like across the country!} Their prices on their website are a lot more expensive than if you call them, and you can usually talk them down a bit {By the way this is my own opinion, they are not paying me for this, I just love them} CALL THEM. Anyway, What happens is you tell them how much room you need and then they drop off a pod like thing, you pack your own things {isn’t that great? Then you can choose where everything goes, and it is a bit cheaper than some other companies} You lock it with a padlock {The only other person that could get in there is the driver.} Then they come pick it up, and drive it for you. It took them about a week to get our stuff from Idaho to Florida. They drop the pod off at the site you designated and then you unpack and they pick up the pod later. I know another company called PODS does it also, but they seem to only service bigger cities, so we used Upack. I don’t have experience with PODS, but they are very similar. Anyway, highly recommend Upack {ABF trucks} I have used Uhaul a few times and they are the cheapest for shorter distances, but I am not very impressed with how they handle things sometimes. But, cheaper is… eh, cheaper right? Guess that counts for service, too!
8.Whew! Sorry about that rant, just wanted to share. Also- that last week you are going to want to get your mail forwarded. It takes a while to get all of your addresses changed on everything, and you don’t want to miss an important piece of mail!
9. If you are driving your car during your move, get it serviced and make sure that everything is in ship shape! We drove our Honda across the country and were SOO Glad we got the air conditioning checked/serviced the week before we moved. Nashville, Tennessee has to be the hottest most humid place on the entire planet. {well, maybe not, but it was stinking hot!} But really, take your car in if you are driving it as part of your move.
10. Finally, Let those you love know you are leaving and make sure you are able to get your goodbyes in and last time hurrah’s. Don’t save it for the last day, you just don’t have time! Everyone is different on how they like to say good bye. And with technology it is so nice that we are able to stay in touch with our friends and family so well. But there will be people you want to give your new address, email, new phone number, etc. to. So do it that last week, and get some big hugs in there, too
Anyway! I just wanted to share some of my tips for moving! Let me know if you have anything to add! I would love to hear! Happy *unstressful* moving!
Traci
Share
The post Moving Tips: The week before… appeared first on A Mouse In My Kitchen.
]]>The post Woolzies Dryer Balls Review appeared first on A Mouse In My Kitchen.
]]>
{Disclaimer: I received free product in compensation for this review, however, I am going to give you my honest thoughts, and the pro’s and con’s}
Laundry is kind of a booger yah know? It just never goes away, but at the same time, I think about my Grandmother and how she washed her clothes by hand, and hung them to dry and then ironed them, and I realize, I don’t have it bad at all. And! I am overjoyed! To share a new product I got to try out. They are Woolzies 100% Pure New Zealand Wool Dryer Balls.
I love my laundry to smell fresh and clean, and I used to use fabric softener sheets, dryer bars, etc, but started to feel as though they were kind of bad for you! Along with that, I have a Father who is VERY Asthmatic and a nephew and I didn’t want to ever make them worse by drying their clothes or things they come in contact with, with something that could hurt them! I also worry about the things that go into those dryer sheets, and didn’t really feel like letting my kids come in contact with extra chemicals.I also found out that commercial dyer liquids and sheets contain chemicals that destroy the fire retardant in clothes and reduce the absorbancy of towels! Lame! That was why I was SUPER intrigued by Wool Dryer Balls. Markell first introduced them to me and I was SO EXCITED To try them out!
I gave them a good 2-3 weeks to test them out and want to share my thoughts!
First, what the heck? Balls made out wool for your dyer, what are they supposed to do? {My first thoughts}
Woolzies are made from 100% New Zealand Wool that do everything that regular fabric softeners do, except! They reduce your drying time by 25%. They also have NO Chemicals, so are hypoallergenic and even safe for those with wool sensitivities. Cool!
Here is what they look like. They are completely handmade!

You just toss six or more of the dryer balls into your dyer with your clothes. I was super skeptical that they would reduce drying time, but was pleasantly surprised to realize that they were working! Normally, with a large load, I have to use the hotter setting, or my clothes just don’t dry, but with the dryer balls, I was able to use a setting with less heat, and still have my large load dry! We are able to use our “energy saving” setting now, and have our clothes come out dry! I would definitely say they make a difference in drying time, you still have to run your dyer, but it reduces the amount of time you have to run it, saving you money and time! Yay!!
I was also a bit skeptical about it being a fabric softener & static reducer. I was very excited that the balls reduced static, but didn’t feel like it made my clothes much softer, maybe a bit, but not enough that I could tell a big difference. They do mention that once you have used the balls for a while piling will occur on the balls.I am hoping once that occurs and I give them a bit more use maybe they will soften my clothes a bit more. And maybe my clothes juts need a bit more time with the dryer balls before they soften up, but didn’t see a huge significant change there.
I did notice a difference in my husbands work shirts as far as eliminating wrinkles, it’s really nice not having to iron his shirts as often!
I also was very excited that my clothes just come out smelling so fresh. Not like an air freshener or fake scent, but just a natural CLEAN smell. I am SO grateful for that! Speaking of good smelling laundry, You can use essential oils with the balls! When your laundry is dry, you take 2 of the dyer balls and add some essential oil of your choice to the ball. Then toss the balls back in and run on air fluff for 10 minutes. The laundry will smell incredible ad the scent will be there for days! I love this!! Essential oils are my favorite, what a great way to freshen clothes!
And did I mention that they last for 1,000 Loads, That is amazing! SO worth it for me to purchase these again. Dyer sheets get used up SO quickly, it’s nice to be able to have something that will last me a LONG time.
Overall, I am converted to using Wool Dyer Balls. I feel like the investment is worth it to reduce drying time and save me electricity. And more importantly, use a product that naturally works, and is safe for my sweet family.

Be Sure to Check out Woolzies FaceBook Page and like them! And follow them on Twitter!
You won’t regret trying these out! I am always so grateful for products that make my life easier!
Happy Laundering!
Traci
I received one or more of the products mentioned above for free using Tomoson.com. Regardless, I only recommend products or services I use personally and believe will be good for my readers.
The post Woolzies Dryer Balls Review appeared first on A Mouse In My Kitchen.
]]>The post Create a Large Framed Fine Art Print {for under $50 dollars!} appeared first on A Mouse In My Kitchen.
]]>
I am so excited to share this post with you! I really wish I would have taken more pictures for you guys, but you’ll see what I mean as I describe how I did this.
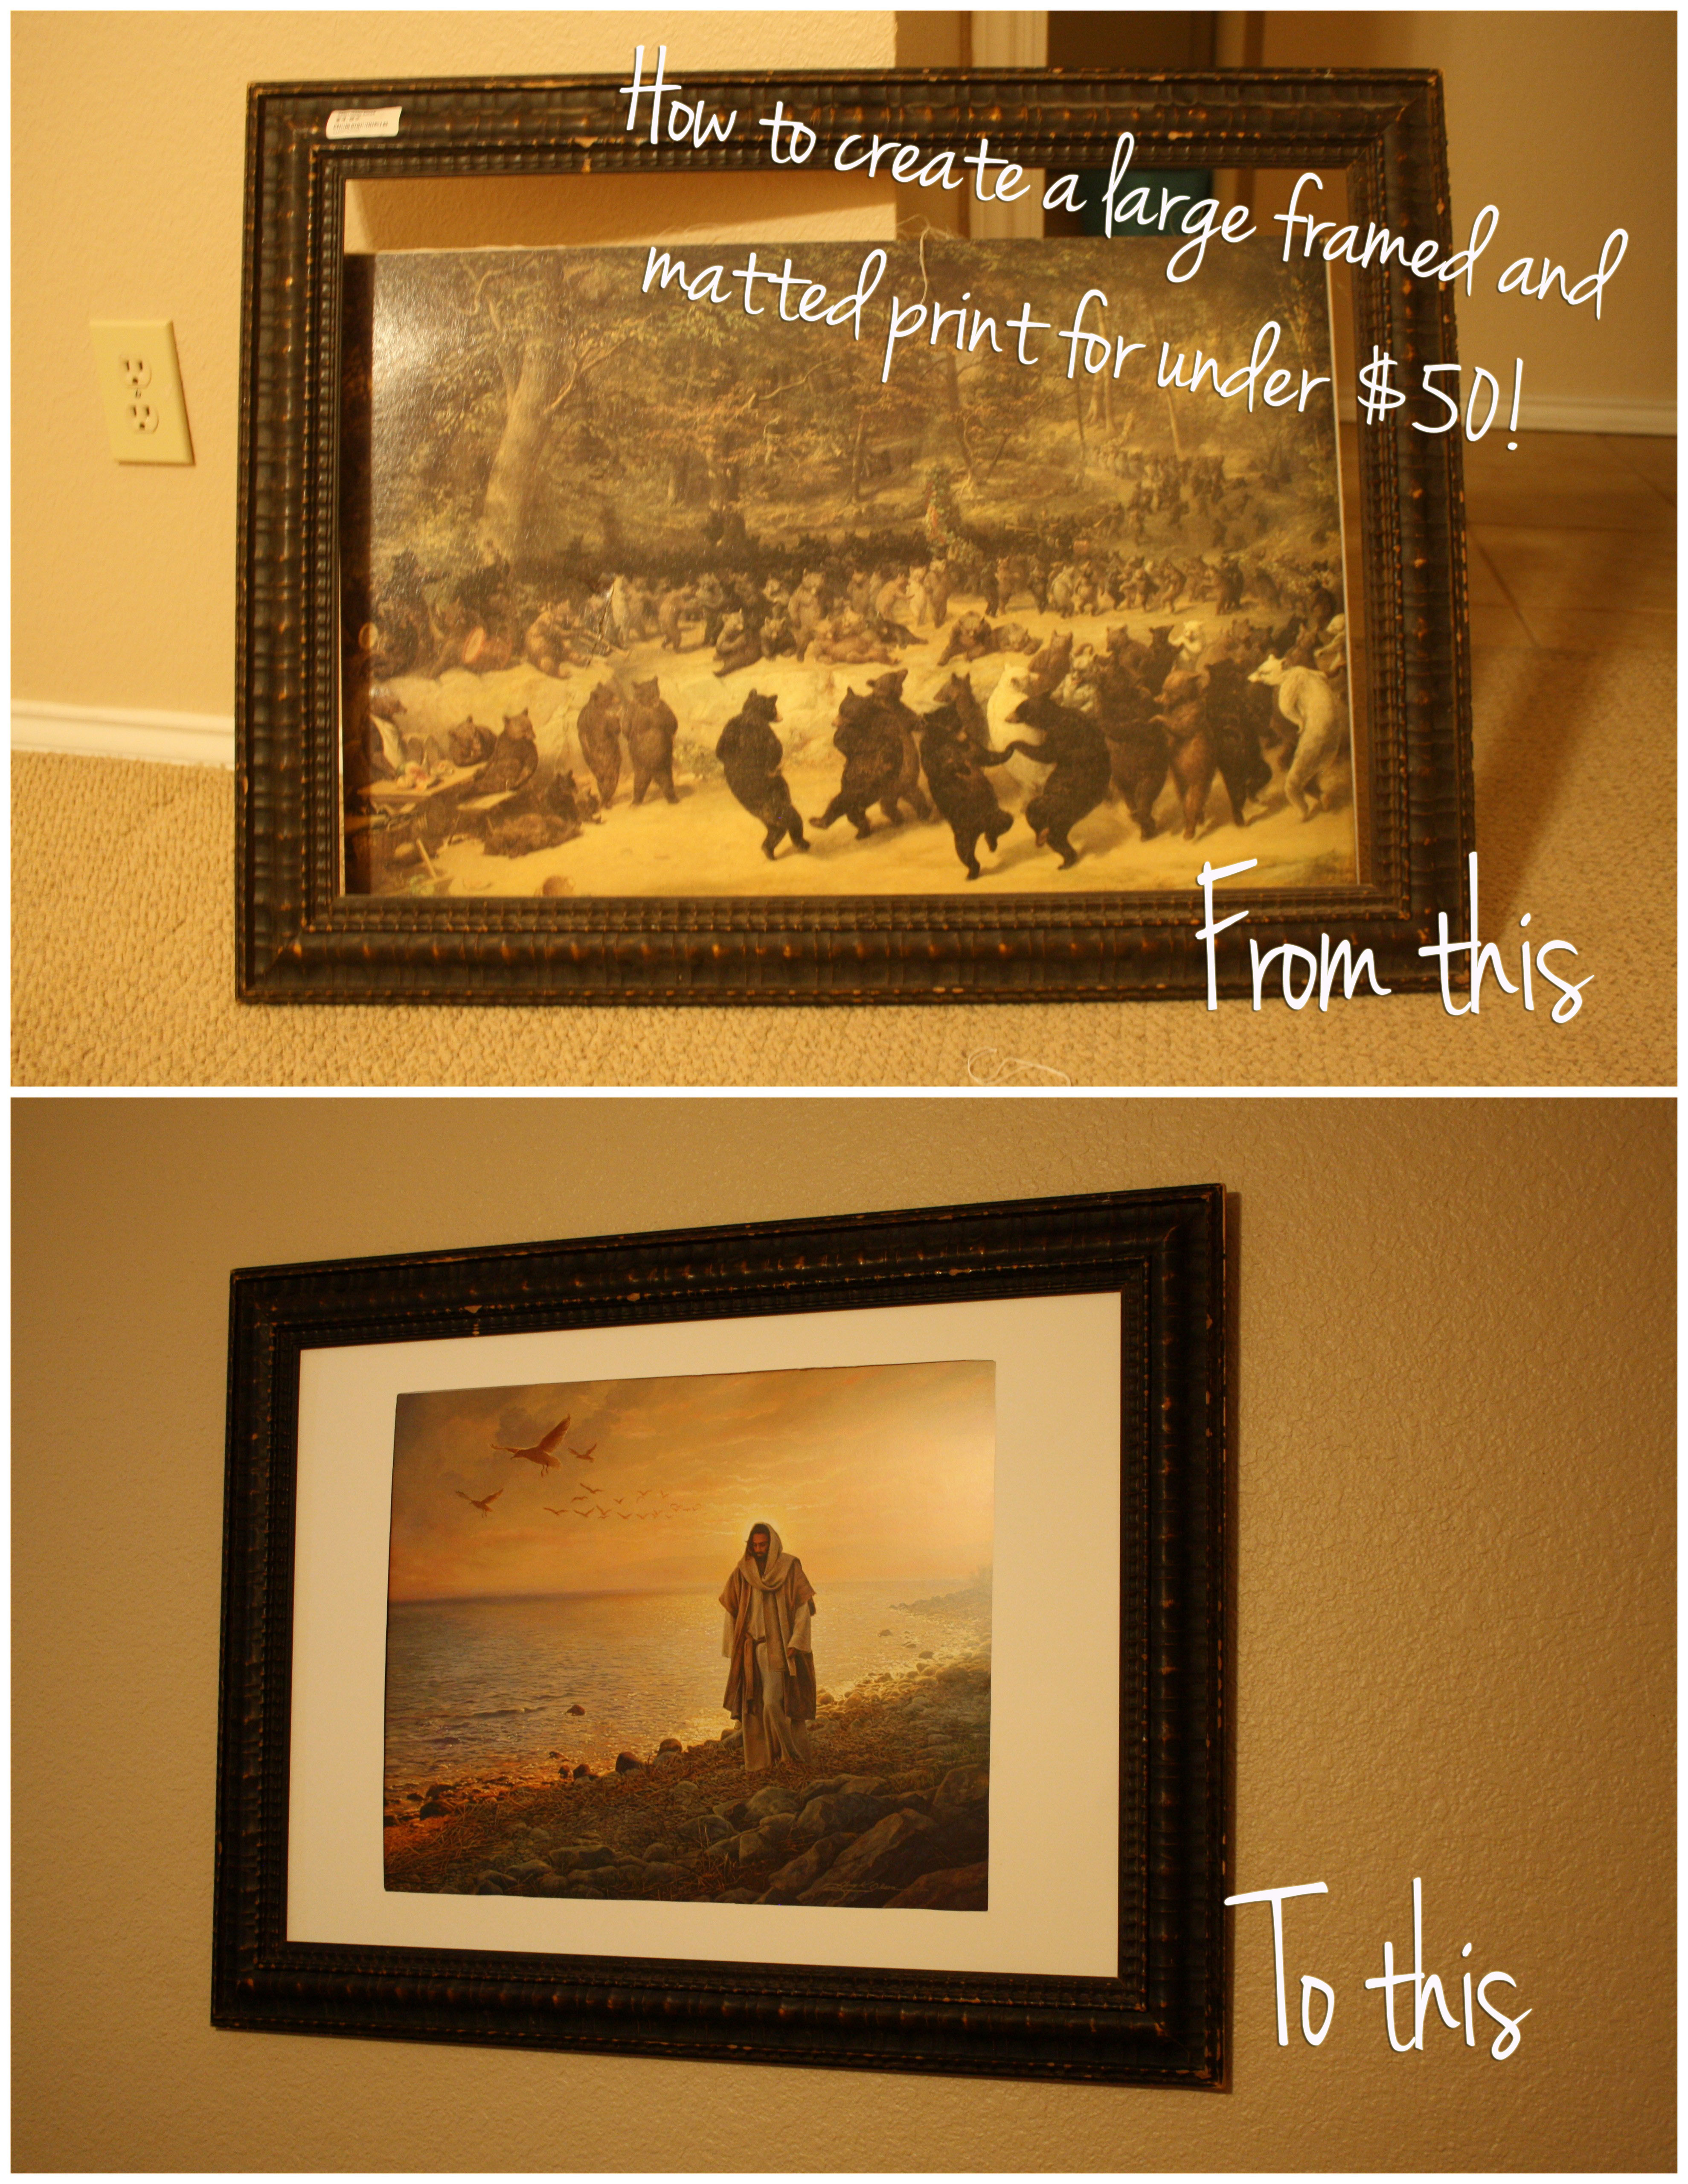
I have really been wanting to purchase a picture of Christ {Framed and Matted} for My husband and My Bedroom. We have a lot of smaller pictures of Christ up, but I really want to have some bigger ones, but they are crazy expensive! A 33×21 Framed Picture of Christ would cost me around0 $300 dollars. Which is not really in our budget right now. So, my husband and I started brainstorming. I decided to head over to Goodwill and a store next to it that is similar called ReStore {they are a lot like goodwill but they have more home things {doors, windows, etc.} I found a huge pile of frames and started digging. This is what I found…
 Sweet, huh? I really could not figure out who would hang a bunch of dancing bears in their home, my husband pointed out that it was probably in a cabin, I can see that… maybe.
Anywho! Look at that frame! Super solid, and gorgeous! Plus, it was only $4.95. Can’t beat that!! We ended up just taking the canvas photo out, and wiped the dusty frame down a bit. I actually really liked the kind of worn look, so I didn’t even have to paint it! And the dancing bears went into the trash. Which was quite disappointing for my little girl, she kept getting excited and saying, “DOG!!”
Next step was finding a print. I ended up ordering one online from Greg Olsen. I love his art work of Christ {and no, I am not being paid to say that! } That print was the most expensive part, around $45 dollars for a 16×20 print. I really wanted a nice big one though.
So the picture arrived in the mail, and I was super stoked, it didn’t quite fit though, so I had to figure out how to make or buy a mat. My husband came up with the idea of using a poster board. We went to Target and picked up a $1 thin poster board. We measured out the size of square we needed to cut out for the picture, and used my fabric rotary cutter, and board to cut out the 16×20 print. Then we put it in the frame and just cut a piece of cardboard from the print packaging to help the picture stay in on the back.

Not too shabby, right? If you look REALLY close, the rotary cutter wasn’t great, but you can’t tell at all if you’re not being picky! I ended up spending about $50 dollars even for a 33×25 matted print of Christ. There is no glass, but that doesn’t bother me a bit. Someday I may put some glass in there, but for now, I love it, and love being able to have a beautiful photo of Christ in my bedroom, without spending a fortune.
What do you think? Let me know if you have any questions/thoughts!?
Traci
ShareThe post Create a Large Framed Fine Art Print {for under $50 dollars!} appeared first on A Mouse In My Kitchen.
]]>The post Teaching your child about Friendship {using Ruby’s Studio “The Friendship Show”} + a Giveaway! appeared first on A Mouse In My Kitchen.
]]> And I wouldn’t share it if I didn’t think it was worthwhile!}
I have mentioned a few times that we just moved across a few states My little boy is three, and this move was quite a bit harder than our last when he was only 12 months old. He had a set of friends he was used to, remembered our apartment, and still talks quite often about “when we we’re in Florida”. He is a super sweet little boy and has a lot of my personality in him. Meaning, he is an introvert. He doesn’t like big groups of people and would rather play with friends one-on-one. Which is totally fine, but makes it hard sometimes to make new friends. So after our big move I was eager to help him to make new friends. I would like to share a few things that I have done to help my children make friends and keep them Even before they are in school.
1. Give them as many opportunities to be around other children as you can-so that they learn how to interact with all types of kids and personalities. We like to go to the mall and play at the play place, the park, church activities with other kids, etc. Get them out there! The only way there are going to learn is if you give them opportunities with other kids.
2. Ease them into it. I failed at this, when we first moved, I would get frustrated and say “Just go play with your friends, I don’t need to be right by you, Go play!!” I realized that my little boy needed some easing into making friends. I started by sitting with him and playing with him and the new friends he was making and playing right along with them, then I gradually would ease away and let him go at his own pace, if he wasn’t ready or didn’t feel comfortable, I was okay with that.
3. One thing I have used with my son is called “The Friendship Show” by Ruby’s Studio. I was really excited to find this, and have been amazed with how wonderful this show ended up being for my son. My son is 3 and sat through the entire movie, concentrating very hard! I could tell he was very interested, and engaged by what Ruby was teaching. {The show is geared towards children aged 3-9}
I, as a mother, also enjoyed the show, and was very impressed with how simply they explained friendship to children. The show is very well done, and you can tell, took a lot of time an effort from very artistic and talented individuals. This is not just some random props thrown in front of the screen and cheap animation, this is the real deal. Real art, great modern music and visuals, and just beautiful images and sounds all around.

The show is conducted by a lovely & kind lady named Ruby. She reminds me of a Princess mixed with Mary Poppins. I loved her from the beginning. She has a soothing voice, and I really wish I could have her come babysit my kids for me. She is enthusiastic and understanding, and explains things simply and effectively. 
The show has a few different segments and breaks it up enough to keep children engaged, and to teach different principles about friendship. There were a few very well done cartoons teaching about how to make friends, a little clip with two friends who had to learn how to compromise, four super cute and perceptive children who talk about their friends, and how they are a good friend in th eir own lives… and a thoughtful craft idea to give to a friend!
I wish I was better at explaining, but to give you an idea of what the show is like you can watch a preview here.
Another thing I really liked about Ruby’s Studio: The Friendship Show, was that it is entertaining but not a crazy-over-the-top-physco-cartoon. I have such a hard time finding shows I am okay with my son watching. He is only three, and a lot of things are still scary for him {yes, even some Disney shows} I appreciate kids shows that keep the innocence and sweetness in my little man for as long as I possibly can.
Lastly, I like to look and see who is making these movies my kids are watching. The company that started this show is called “The Mother Company”. You can learn more about them, here. They have amazing parenting articles, and of course, great products, like The Friendship Show.They are actual MOTHERS. People who HAVE children, and are raising/have raised kids! Not someone with a PhD who thinks they know what my kid needs to know, but has never actually raised a child, not someone with a corporate agenda, real life mothers, who want to help other mothers to raise children with emotional intelligence. They even mention on their website that they are trying to help young children become good people! Thank You! We need more companies likes yours.
They have a variety of products, and give you the option of buying a DVD or downloading their shows directly to your computer or iPad or iPhone or whatever They also have books, and music, dolls, and gift sets. Check It out, here!
Are you ready for the super amazing giveaway? Here goes, Ruby’s Studio is giving away a $25 dollar gift card to Amazon! All you need to do is check them out on facebook and like their page!
Follow the instructions on the Rafflecopter and you are good to go! This giveaway will be posted for one week.
a Rafflecopter giveaway
Finally, I would like to add one more idea to teach your child about friendship.
5. Be a good friend yourself. Be a good friend to others and be that example. Be a friend to your child {always being a parent first} But teach them by example what it means to be a friend.
Good Luck with the giveaway, and don’t forget to to check out Ruby’s Studio!
Traci
The post Teaching your child about Friendship {using Ruby’s Studio “The Friendship Show”} + a Giveaway! appeared first on A Mouse In My Kitchen.
]]>