The post Free Blogger Opp appeared first on A Mouse In My Kitchen.
]]>
It’s Christmas Baker’s Edition Event
Organized by: Mom Powered Media
Grand Prize: KitchenAid Tilt-head Stand Mixer + accessories
Event dates: 11/18 – 12/9
Open to US + Canada
Referral prize: $25 Amazon E-Code or Paypal Cash
Bloggers: Sign Up HERE
ShareThe post Free Blogger Opp appeared first on A Mouse In My Kitchen.
]]>The post Growing Together Blogging Course appeared first on A Mouse In My Kitchen.
]]>
It’s been so fun to learn all this blogging stuff and get to know the other bloggers in the group. I feel like it’s helped me get close to some ladies that I never would have “met” otherwise. And blogging is all about who you know, ya know!
Anyway, I love blogging. I love that it gives me a place to express myself. I love that there is so much to learn about blogging. It gives me something to do when my kids are sleeping. It gives me a place to be me, Markell, not Mom or Wife. It gives me fun things in the mail once in awhile. It gives me people to talk to. While I know that there are SO many things that are way more important that this blog in my life, I am grateful for it and I’m grateful to all my awesome readers. It’s so neat that people actually want to read what I have to say. Thanks guys! And thanks, Amy, for putting together this class 
I highly recommend this class to anyone looking to learn more about the blogging world. Best $35 I’ve spent on blogging, by far.
ShareThe post Growing Together Blogging Course appeared first on A Mouse In My Kitchen.
]]>The post How to map an image (put more than one link on one picture) appeared first on A Mouse In My Kitchen.
]]> One thing I realized quickly after I started blogging was that there are a lot of things that I don’t know. I started seeing other blogs that had social icons that seemed to be one picture, but with links to lots of different places. At first, I thought they were just uploading lots of pictures and setting them next to each other, and I tried doing that, but it didn’t work. Sometimes, one of the links would go on the next line, or wouldn’t line up just right. I realized there was a trick that I didn’t know about. So, I did some searching, and I figured it out. So, I decided to share with you all how to map an image.
First of all, I found out that what I was trying to do was called image mapping. You map out an image so that when you click different parts, it goes to different places. The website that will help you out with this trick is image-maps.com.
Before you go to that website, you first need your picture. For this tutorial, I’ll show you how I configured my social media icons. I downloaded these icons from carrieloves.com. I used Photoshop to put them all into one picture, then I changed the color so it would match my layout, deleted the background, and saved it as a .png file so that there would be no background, just the circles.
So, now, I’ve got this:

And what I wanted was for my readers to click the twitter icon and go to my twitter account, pinterest icon and go to my pinterest account, etc. So, my next step is to go to image-maps.com and get started.
It’s pretty simple, and it’s free. No signing in or anything.
The first step is to upload the picture.
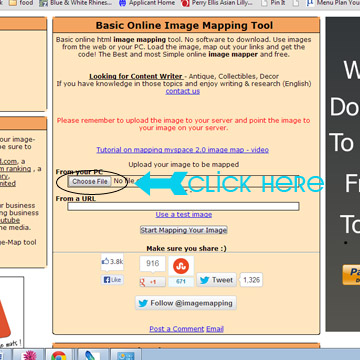
Just click the chose file box and upload your picture.
Click the “start mapping your image button”
Deselect the base URL box and the Show Text Link box
Select the “rectangle” box
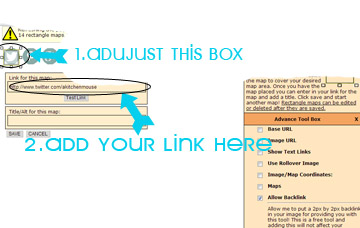
Adjust the rectangle so that it fits where you want it. Add the destination link in the text box below. Click save.
Repeat this step until all of your links have been added.
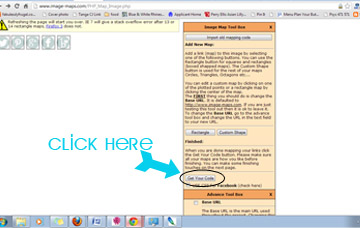
Click “Get The Code”
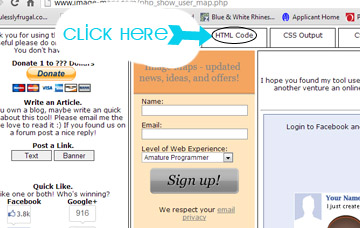
Don’t worry about signing in. Just click the tab that says “HTML CODE” and copy and paste your code.
Now you have your map!
Install it on your website wherever you want it by copy and pasting it. Check it out and make sure all the links work.
There is still one more thing you need to do. The image-mapping website doesn’t save your pictures for more than a couple days so you need to host it on another site. I use photobucket. Simply upload your photo to your photobucket account and copy the direct link. Go to back to your code and find where it says src=”http://www.image-maps.com/uploaded_files/xxxx”. Deleted from the http to the end of the link and paste your photobucket code in. If you don’t do this, your image will be deleted and it won’t work.
I hope this helped you! Let me know where you use it so I can come check out your handy work!
Share
The post How to map an image (put more than one link on one picture) appeared first on A Mouse In My Kitchen.
]]>The post Pin It Proudly Link Party #2 appeared first on A Mouse In My Kitchen.
]]> 
I’m excited to feature a few of my (and your) favorite pins from last week:

Strawberry Smoothie from Sara Howe
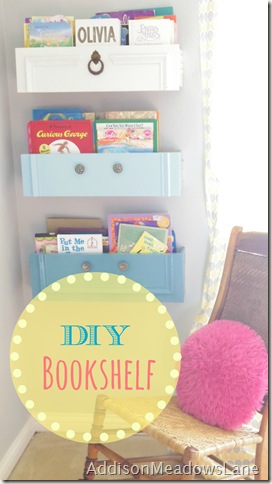
DIY Bookshelf from drawers by Addison Meadows Lane
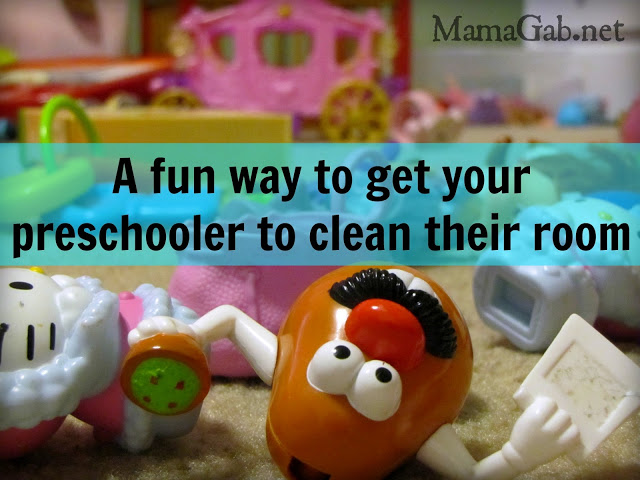
A fun way to get your preschooler to clean their room by Mama Gab
Congrats on the features! If you’d like, you can grab a feature button over on the sidebar and display it proudly on your blog!
On to this weeks hop!


I have three new fabulous co hosts this week.
click the logos to follow via pinterest, the links below to follow via bloglovin’/gfc
Follow via bloglovin’

Be sure to check out the first four pins (the ones from the host and co hosts) and repin them if you like them!
One more rule! No sponsored posts or giveaways please Thanks!
Make sure you come back next week to see if your pin was featured!
If you want to grab a button, it’s in the sidebar!
If you’d like to co-host this hop, please Email me! .
Show some love for this months sponsors!
If you’d like to advertise on this blog hop, click here
Add your pinterest accounts here:
The post Pin It Proudly Link Party #2 appeared first on A Mouse In My Kitchen.
]]>The post Five Ways To Be A More Organized Blogger appeared first on A Mouse In My Kitchen.
]]> Blogging can be really time consuming. There are link parties to join, comments to write, emails to answer, reviews to write, posts that need written, surveys that need filled out, and many more things that can demand the time of a blogger. It can be addicting and completely time consuming if it gets out of hand. A lot of people want to make it big blogging, and a lot of people already have. I have found through my short time (five months) of blogging that there are a few tips to help you get the most out of your blogging time without wasting your life away on your computer.
1. Set a time limit
Don’t let yourself get carried away. Unless your blog is bringing in a substantial income, there is no reason to spend more than an hour or two (at the most!) a day on your blog. Set a time limit for yourself and when your times up, get off the computer. Spending too much time blogging, especially when you’re just starting out can lead to burnout and frustration.
2. Unsubscribe From Emails You Don’t Want
As a blogger, there are TONS and TONS of different ways to receive products to review, make money, receive free offers, whatever. The problem is each time you sign up for a different one, you get on a mailing list. The overload in junk emails makes it hard to see what emails are important. If you are regularly getting an email that you don’t read, unsubscribe to that mailing list. It can save you time spent cleaning out your inbox in the future.
3. Write, Write, and Write Some More
If you’re having a creative day and find yourself with lots of time and lots of ideas for posts, write them down. Write until you can write no longer. Schedule your posts for a later date, or keep them in draft from for a day when you can’t think of a danged thing to say. You’ll be glad you did. I generally try to have at least a month planned out in advanced.
4. Develop a Pattern
If you have a few different topics you like to write about, have a pattern for when you write them. For example, I generally post recipes on Mondays. This makes it easier for me to come up with something to write that day because I know exactly what I want to post, a new recipe. It’s also good to develop a posting pattern. Are you going to post every day? Three times a week? Twice a month? Whatever it is, be consistent. This will help you know when you need your next post up and it will help your readers know when to expect new content.
5. Keep Your Social Networking To A Minimum
Pick three-five social networks to have a presence in. No more than that. No one can keep up with twenty different social networks. I have chosen to do Facebook, Twitter, Pinterest, and Instagram. I also have a google+, but I don’t really keep up with it much. Those four are about all I can handle. I feel like it’s better to have a strong presence in a few than a weak presence in a lot of areas.
Those are my first five tips for being a more organized blogger. What do you do to be more organized? Leave me a comment with your tips and I might feature them in my next post.
ShareThe post Five Ways To Be A More Organized Blogger appeared first on A Mouse In My Kitchen.
]]>